Avoid bicycle maintenance bloodlust
A few months ago I did a tech column moaning about how the parts for your bike often don’t fit together very well, hopefully some people found it interesting but I later realised that it wasn’t a fat lot of use to most riders. So this month, rather than rattle on about some deep technical issue, I thought it would be more helpful to describe some of the less well known “tricks” that can make your life a hell of a lot easier when it comes to mending your bike.
Now I could write an illustrated guide about how to change one particular aspect of your bike but there are so many variables that it just wouldn’t be that useful. So instead I am going to talk in depth about some general techniques that will work in a lot of situations, so hopefully next time you hit a snag you can “think” your way round the problem before resorting to brute force.
But first a friendly disclaimer. Existing is dangerous. Leaving the house is practically an invitation to disaster. Working on your own bike is the virtually suicidal. You might as well go and drop your scrotum into a blender as even consider picking up a spanner. Tools and bike parts can break and fly up to maim or kill you. It’s your bike, you are in control of your own actions, if you choose to work on it yourself then you take any and all risks for yourself. Wear protective eyewear at ALL times, even in the bath, removing your full face helmet at anytime is entirely at your own risk. You should always have a fire extinguisher at hand and the assistance of a trained paramedic available. I and Ride BMX magazine couldn’t give two shits if your bike works or not, so if you manage to cock something up and mangle yourself into a paste please do not go crying to a lawyer, it’s your own damn fault…..
Number 1. The Spreader Trick.
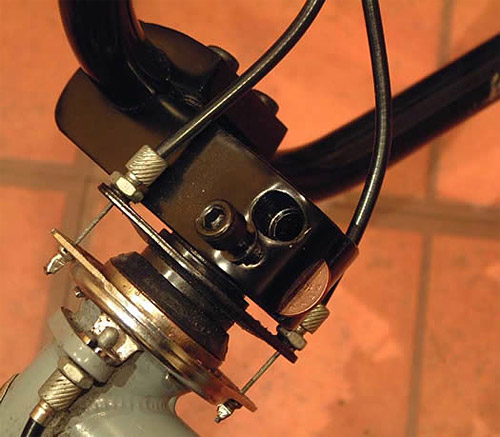
Pinch-bolts are a common feature of many bike parts. The backs of stems are the obvious example but you also find them on cranks, seat-clamps and some brake levers. One side is threaded while the other has a recess for the head of the Allen bolt. When you tighten the bolt the two halves are drawn together and shit gets clamped. But, when you come to undo them the part does not always spring apart again, so the stem or crank arm can be a bitch to remove. In this situation many people will reach for a screwdriver and jam it in the slot to lever the two sides apart. This often works but is awkward and makes a mess of the part. As long as the hole is threaded right the way through this is the time to use “the spreader trick”.
Loosen off all the bolts then remove them all the way from the part. Then take them round to their opposite side of the part and start screwing them directly into the tapped side. Now you just need to insert a suitable bit of “stuff” into the slot for them to push against, you can use a flat spanner or a coin or any old piece of scrap, but whatever you use is likely to get marked and damaged so don’t use your best cone spanner or anything!
As you turn the bolt the two sides get forced gently apart and the part should loosen off perfectly.
This trick is particularly useful if you have a “pinched” stem and need to insert a shim. When a stem has pinched at the back it looses nearly all its clamping power. The face that the head of the bolt sits on is no longer perpendicular to the thread of the bolt so lots of power is wasted. If you just try to add a shim without spreading the stem then it can be a nightmare to get together, but using the spreading trick you can open the slot slightly past its “correct” parrallel sided position and get a nice few layers of shim (cut from a pop can) in there.
The Spreader Trick is a good one but you can overdo it. On cranks that use a big fat spline it can help with removal, but if you do it too much you can actually make it HARDER to remove the arm as the splines nearer the pinch bolt “twist” in their grooves and jam like a wedge. It is very tempting when this happens to spread the slot even more but you will only make things worse, so back off and if things don’t improve, even try putting the bolts back the ordinary way and tightening a minute amount.

Go Easy on this. It Doesnt take much force to spread the slot a lot.
Number 2. The SHOCK trick.
Quite a few parts on a bike have a tendency to “self tighten”, freewheels and pedals are the obvious examples. Others can corrode in place and seem almost impossible to remove. In these circumstances it is essential to have the right tool for the job, rounding off a quarter inch Allen key bolt by using a slightly smaller 6mm allen key (like on an American made stem) is a great way to piss yourself off. But even with the right tool some things can seem immovable. Trying to get a pedal undone is great fun, with all the possibilities it offers for skinning your knuckles or driving a sprocket tooth deep into your arm.
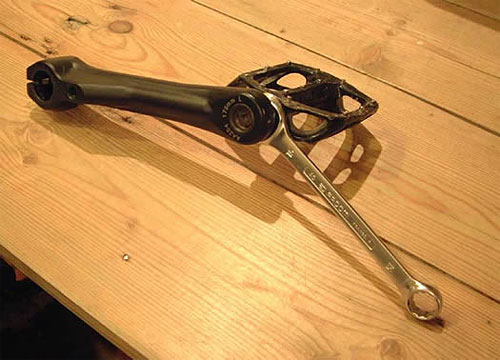
In these cases the seized thread responds much better to a SUDDEN application of torque than it does to a relatively gradual push. So for example in the case of a pedal, position the pedal-spanner in a good position for you to stamp on it, make sure that the spanner is well on the flats then just STAMP on the fucker. The sudden jar will be much more likely to break the pedal free of the crank.
Bear in mind that cheap spanners (and even some supposedly good ones) might not take this kind of treatment too well and could conceivably snap so be careful, read all warnings on tools, wear eye protection, stick a helmet on etc etc….
IF you are going to use this trick, make DAMN sure that you are going to turn the spanner the right way, if you do this the wrong way and tighten it in even more it isn’t going to help much. Remember that left hand pedals have a left hand thread so undo clockwise. Most other threads are right hand and undo anti-clockwise…
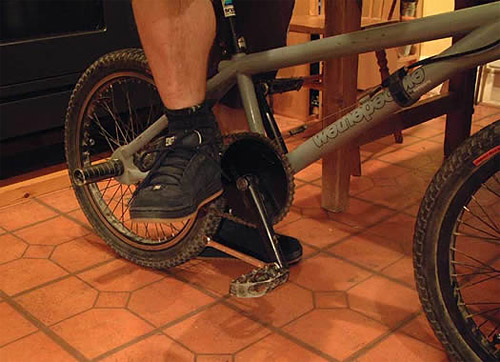
If the crank is already off the bike then you can put the spanner on, then prop the spanner-crank-pedal assembly on the ground so it forms a little mound. Provided you have thought it through and propped them the right way up, a good stamp on the top will loosen the pedal off nicely. Note that it is a good idea to think about the floor underneath before doing this. It WILL get ragged.
It is much harder to apply the same kind of shock to a stuck freewheel but if you can it will help. What I do in this case is to make sure the freewheel remover is securely bolted to the wheel with the wheel nut (or bolt) first. Then clamp the remover firmly in a good solid bench vice. With the tyre still on and at least slightly inflated, grip the two sides of the wheel in each hand and brace yourself. Now, instead of the normal “heave”, what I do is wind myself up then scream “Strength of a bear!” and throw my weight in the correct direction as hard as I can, really freak out on it. You will look like a tit, but the chances of breaking the freewheel thread free are much improved and that’s what matters.

Make ABSOLUTELY sure you are going to turn the pedal the correct way before stamping.

Just stamp on the top of this little pyramid and the pedal should come un-done easily, notice this is a left hand pedal so a left hand thread.
Number 2b. The Hammer Trick.
The hammer is not a tool to be used lightly. Once you pick that thing up, you better be damn sure you have tried everything else and are calm and composed. If you reach for it in the height of bicycle maintenance blood lust then you will almost certainly end up regretting it. Having said that, there are times when it IS the right tool for the job, and it is one of the best ways to shock a part free. Just remember that if you hit something with a big lump of steel it is going to get dented or bent or deformed. If you hit the end of a threaded part like an axle then the threads WILL be damaged, getting a nut on there again probably isn’t going to happen. If you have to hit something as delicate as an axle then put a block of wood in the gap to turn your hammer into a mallet.
Sometimes however we can use the harsh metal on metal contact to our advantage. If a pedal is stuck for example, then tapping round the outside of the pedal boss with the hammer can send shock-waves through and help break the contact between parts. In even more desperate circumstances a more powerful tap will start to deform the boss and actually expand it, so freeing the pedal. These are desperate measures so don’t use them unless all else has failed, but the results can be amazing.
